Wednesday, 13 July 2016

SharePoint calculated column and hyperlink (no workflows or scripts needed)

This seems to be an easy task, except one thing: SharePoint doest not render hyperlink in calculated column by default.
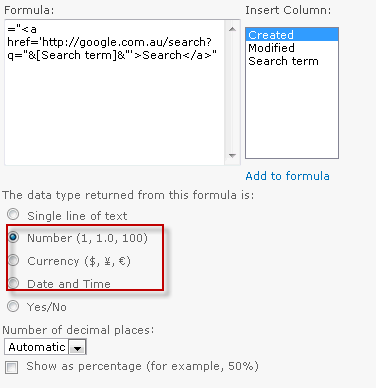
For example, I have a list with 2 columns: Search term and Google Search. Google Search is a calculated column with this formula
Now, this is what I will get by default:
There are a few ways to fix this problem. Usually people will recommend you to create a Hyperlink column instead and create a workflow to update the Hyperlink value (http://social.technet.microsoft.com/Forums/ar/sharepoint2010customization/thread/32d32e47-3256-4806-8775-c250b6243038) . Or, you can place a script on the page that loop through the HTML nodes and replace the unfriendly html tags with a hyperlink as described herehttp://practicalsharepoint.blogspot.com/2011/10/dynamic-hyperlinks-in-calculated.html.
But today, I’m going to show you how to trick SharePoint into displaying the hyperlink, and it is going to be very easy.
1. Modify the calculated column and change the returned data type from Single line of text to Number/Currency/Date and Times. Click OK.
2. Go back to the list and be amazed:)
This will also work when you’d like to achieve the same thing with the image tag <img>.

Monday, 4 July 2016

Installing and configuring workflow for SharePoint Server 2013, Step by Step

Reference Link

 
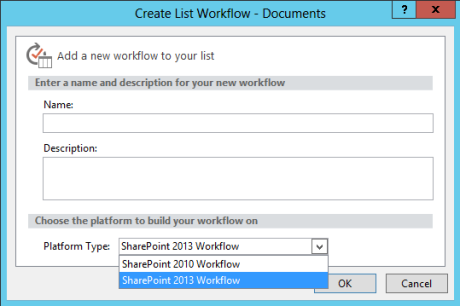
En estos dias estuve revisando el tema del nuevo WebApplication de Workflow de SharePoint 2013, y la configuracion del mismo es bastante diferente. cuando se intenta realizer un WF desde Designer solo se observa SharePoint 2010 disponible.
WFSharePoint2013-1
Cuando se navega en el central administrator -> Application Management -> Manage Service Applications -> Workflow Service Application se obtiene un error como:
SharePoint 2013 workflow requires a compatible workflow service configured with SharePoint such as Workflow Manager. The workflow service is either not installed or not configured. Follow this link to find out how to set up workflow.
Entonces estos son los pasos para instalar workflow sharepoint 2013
1. Tener en cuenta las consideraciones de diseño descritas en este pots:http://technet.microsoft.com/en-us/library/jj658588(v=office.15)
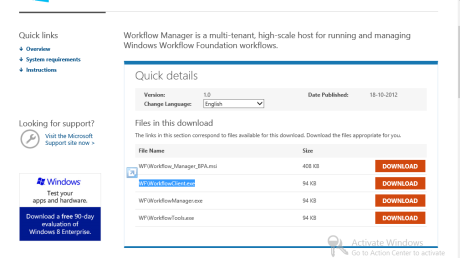
2A. Para realizar la configuración en un servidor aparte es necesario descargar el Workflow Manager Client [http://go.microsoft.com/fwlink/p/?LinkID=268376].
2B. En el caso en el que se va a configurar Workflow Manager en un servidor que ya posee SharePoint Server 2013, nos ahorramos el paso de descargar el Workflow Manager Client [http://go.microsoft.com/fwlink/p/?LinkID=268376] y lo podrán encontrar en, en el caso de instalarlo en los mismos servidores de la granja se debe asegurar que si se desea balancear el servicio debe estar en todos los WFE, si lo que se desea es instalarlo en un Application Server se debe instalar una sola vez, en el caso de ser un server aparte se debe instalar una sola vez.
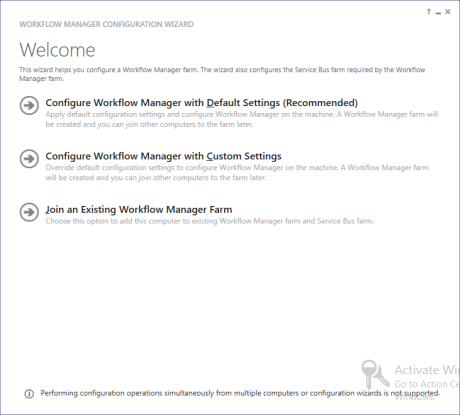
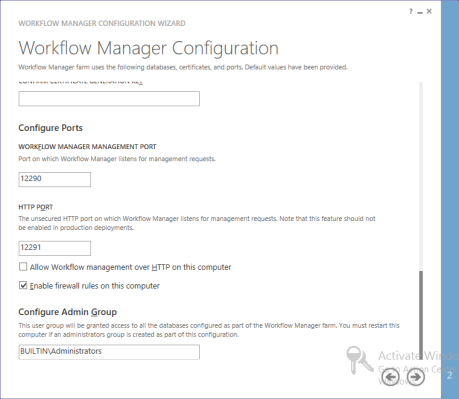
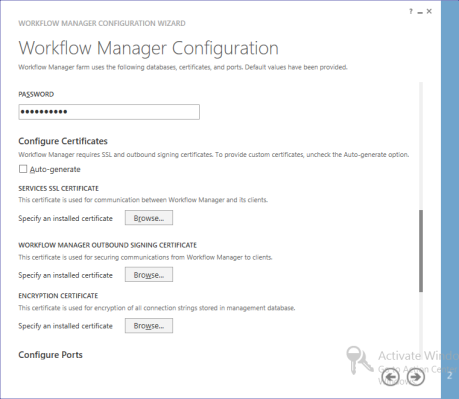
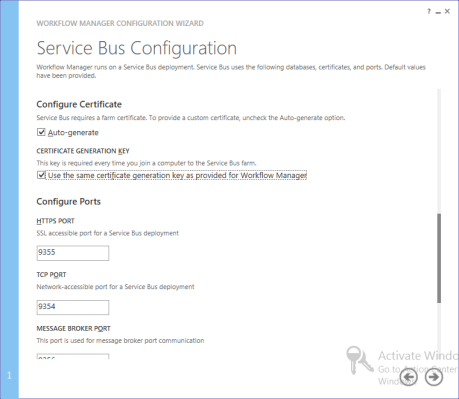
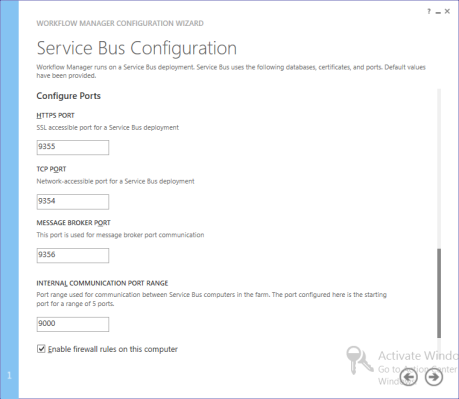
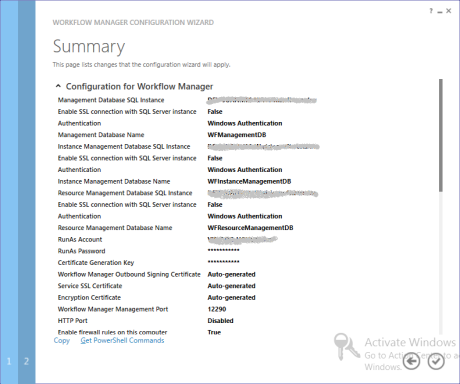
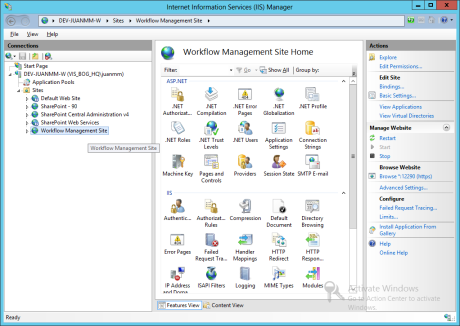
Aqui el paso a paso de la instalación, como veran nos pide 2 puertos para sitios principales y las bases de datos que se crearán en SQL. Aqui un resumen de los datos importantes a tener en cuenta.
URL WEB   FinalesBases de Datos   en SQL
http://devPC:90/TeamSiteWFInstanceManagementDB
http://DEVPC:12290 WFResourceManagementDB
http://DEVPC:12291SbManagementDB

 SbGatewayDatabase

 SBMessageContainer01
Paso 1. Descargarlo. WorkflowManager.exe
WFSharePoint2013-2
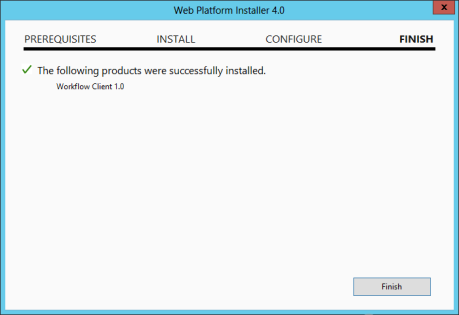
Paso 2.
WFSharePoint2013-3
WFSharePoint2013-5
WFSharePoint2013-6
WFSharePoint2013-7
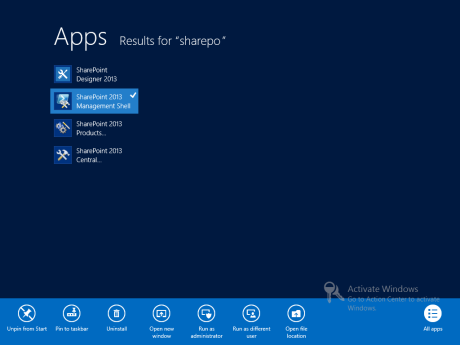
Paso 3. Buscar los binarios
x86: C:\Program Files (x86)\Workflow Manager Tools\1.0
x64: C:\Program Files\Workflow Manager Tools\1.0
WFSharePoint2013-9
WFSharePoint2013-10
WFSharePoint2013-11
WFSharePoint2013-12
WFSharePoint2013-13
WFSharePoint2013-14
WFSharePoint2013-15
WFSharePoint2013-16
WFSharePoint2013-17
WFSharePoint2013-18
WFSharePoint2013-19
3. Finalmente se debe registar el servicio desde powershell por medio de este comando
  Register-SPWorkflowService –SPSite “http://devPC:90/TeamSite “ –WorkflowHostUri “https://devPC.mydomain.loc:12290 “ –AllowOAuthHttp
Super importante el https en 12290

WFSharePoint2013-21
4. Los certificados digitales se instalan desde el IIS en caso de requerirse.
Despues de estos cuantos pasos ya aparece disponible el tipo de WF para SharePoint 2013
WFSharePoint2013-23
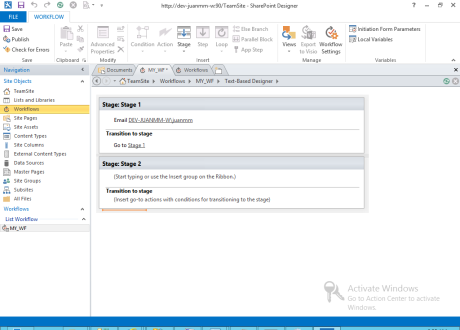
Aqui ya podemos observer una de las nuevas funcionalidades sobre SharePoint 2013, los cuales son el manejo de los estados del flujo y las transiciones entre estados
WFSharePoint2013-24

Workflow with elevated permissions for App Step

Overview of creating a workflow with elevated permissions

Imagine that as a SharePoint administrator, you would like to define some processes for managing user requests for purchases of apps from the Office Store. In the simplest case you want to send an acknowledgment email when a user requests an app. In addition, you could also want to add structure to the request approval process.
By default, workflow does not have permissions to access the app request catalog. Catalog lists in SharePoint require owner (full control) permissions. Workflows generally run at permission level equivalent to write.
To solve this, you have to create a workflow with elevated permissions by doing the following in the Site Collection site:
  1. Allow workflow to use app permissions.
  2. Grant full control permission to workflow.
  3. Develop the workflow to wrap actions inside an App Step.

Allowing a workflow to use app permissions in a SharePoint Server 2013 site

The first step is to allow workflow to use app permissions. You configure workflow to use app permissions on the Site Settings page of the SharePoint Server 2013 site where the workflow will run. The following procedure configures the SharePoint Server 2013 site to allow workflow to use app permissions.
Important note Important
The procedure must be completed by a user that has Site Owner permissions.

To allow workflow to use app permissions

  1. Click the Settings icon as shown in the figure.
    Figure: Opening the Site Settings page

    Settings menu
  2. Go to Site Settings.
  3. In the Site Actions section, select Manage site features.
  4. Locate the feature called Workflows can use app permissions, as shown in the figure, and then click Activate.
    Caution note Caution
    This feature will not activate unless you have properly configured the SharePoint 2013 Workflow platform and also apps for SharePoint.
    Figure: The site feature, 'Workflows can use app permissions'

    Workflow can use app permissions feature

Granting full control permission to a workflow

In order for the workflow to function properly it must be granted full control in the site. The following procedure grants the full control permission to the workflow.
Important note Important
The procedure assumes the following:
  • The procedure must be completed by a user that has Site Owner permissions.
  • The workflow must already be published to the SharePoint Server 2013 site.

To grant full control permission to a workflow

  1. Click the Settings icon as shown in the figure.
    Figure: Opening the Site Settings page

    Settings menu
  2. Go to Site Settings.
  3. In the Users and Permissions section, select Site app permissions.
  4. Copy the client section of the App Identifier. This is the identifier between the last "|" and the "@" sign, as shown in the figure.
    Figure: Selecting the App Identifier

    Selecting App Identifier
  5. Navigate to the Grant permission to an app page. This must be done by browsing to the appinv.aspx page of the site.
    Example: http://{hostname}/{the Site Collection}/_layouts/15/appinv.aspx.
    Note Note
    The 'app' in this step refers to the Workflow app in general and not just a specific workflow. Individual workflows cannot be access controlled. When you enable app permissions you are enabling for all workflows within the Site Collection.
    For more information about setting up a workflow, see Blog article from Sympraxis Consulting: Looping Through Content in a SharePoint 2013 Site Workflow
    The following figure shows an example.
    Figure: The appinv.aspx page and URL example

    The appinv.aspx URL example and page.
  6. Paste the client id in the App Id field and then click Lookup, as shown in the figure.
  7. Paste the following Permissions Request XML to grant full control permission.
    <AppPermissionRequests>
        <AppPermissionRequest Scope="http://sharepoint/content/sitecollection/web" Right="FullControl" />
    </AppPermissionRequests>
    
    
    Caution noteCaution
    There are no placeholders in the Scope value above. It is a literal value. Enter it exactly as it appears here.
    The following figure shows an example of the completed page.
    Figure: Looking up an App Id

    Looking up an App Id.
  8. Click Create.
  9. You will then be asked to trust the Workflow app, as shown in the figure. Click Trust It.
    Figure: Trust the Workflow app

    Trust the Workflow app.

Wrapping actions inside an App Step

Finally, you need to wrap the workflow actions inside an App Step. The following procedure wraps a Send an Email action inside an App Step. The workflow in this example sends an acknowledgement email message from a custom list.

To wrap actions inside an App Step

  1. Open the App Catalog site in SharePoint Designer 2013.
  2. Create a new Custom List on which to run the workflow. In this example the list name is App Demo.
  3. Click Workflows in the navigation window.
  4. Create a new List Workflow for the App Demo list, as shown in the figure.
    Figure: Create a new List workflow

    Create a new List workflow.
  5. Insert an App Step, as shown in the figure.
    Figure: Add an App Step

    Adding an App Step.
  6. Insert a Send an Email action in the App Step.
  7. Click the address book button. In the To field select Workflow lookup for a user and click add as shown in the figure.
    Figure: Select Workflow lookup for a user

    Select Workflow lookup for a user.
  8. Enter the Created By field as the lookup value, as shown in the figure.
    Figure: Lookup for Person dialog box

    Lookup for Person dialog.
  9. Enter Email from App Demo list in the email message body.
  10. Click OK to return to the workflow. The completed workflow is shown in the figure.
    Figure: Email action in App Step

    Email action in App Step.
  11. Click the Workflow Settings icon in the ribbon, as shown in the figure.
    Figure: Workflow Settings icon in ribbon

    Workflow Settings icon in ribbon.
  12. Clear the check box next to Automatic updates to workflow status to the current stage name, and then click Publish, as shown in the figure.
    Figure: Clear the automatic updates check mark and then publish

    Clear automatic updates check mark and publish.

To understand why elevating permissions for a workflow is required, consider that workflows are fundamentally apps for SharePoint and they follow the same authorization rules of the app model. The default configuration for workflow is that the effective permissions of the workflow are an intersection of user permissions and the app permissions, as shown in the figure.
Figure: Permissions diagram

Permissions diagram. There are two reasons why it is necessary to elevate permissions to create a workflow in the App Request list. These are:
  • By default, workflow only has write permission.
  • The user has no permissions.
The first step to solve this problem is to allow the application to authorize by using only its identity and ignoring that of the user. This is done by enabling the App Step feature. The second step grants full control permission to the workflow.
The following diagram illustrates the change in permissions
Figure: Permissions matrix

Permissions matrix.

Log Creation Script

$msg="Everything is allrite"
Write-Log -Message $msg -WarningAction Ignore


function Write-Log
{
    [CmdletBinding()]
    Param
    (
        [Parameter(Mandatory=$true,
                   ValueFromPipelineByPropertyName=$true)]
        [ValidateNotNullOrEmpty()]
        [Alias("LogContent")]
        [string]$Message,

        [Parameter(Mandatory=$false)]
        [Alias('LogPath')]
        [string]$Path='C:\Logs\PowerShellLog.log',
       
        [Parameter(Mandatory=$false)]
        [ValidateSet("Error","Warn","Info")]
        [string]$Level="Info",
       
        [Parameter(Mandatory=$false)]
        [switch]$NoClobber
    )

    Begin
    {
        # Set VerbosePreference to Continue so that verbose messages are displayed.
        $VerbosePreference = 'Continue'
    }
    Process
    {
       
        # If the file already exists and NoClobber was specified, do not write to the log.
        if ((Test-Path $Path) -AND $NoClobber) {
            Write-Error "Log file $Path already exists, and you specified NoClobber. Either delete the file or specify a different name."
            Return
            }

        # If attempting to write to a log file in a folder/path that doesn't exist create the file including the path.
        elseif (!(Test-Path $Path)) {
            Write-Verbose "Creating $Path."
            $NewLogFile = New-Item $Path -Force -ItemType File
            }

        else {
            # Nothing to see here yet.
            }

        # Format Date for our Log File
        $FormattedDate = Get-Date -Format "yyyy-MM-dd HH:mm:ss"

        # Write message to error, warning, or verbose pipeline and specify $LevelText
        switch ($Level) {
            'Error' {
                Write-Error $Message
                $LevelText = 'ERROR:'
                }
            'Warn' {
                Write-Warning $Message
                $LevelText = 'WARNING:'
                }
            'Info' {
                Write-Verbose $Message
                $LevelText = 'INFO:'
                }
            }
       
        # Write log entry to $Path
        "$FormattedDate $LevelText $Message" | Out-File -FilePath $Path -Append
    }
    End
    {
    }
}

Creating Group, Premission level, Assigning permission to the group and Users to the group


<#
NOTE:
-----

In this Powershell Script to achieve Group Creation, Permission Levels Creation, Permission Given to the created group and Add Users to the group.
--------------------------------------------------------------------------------------------------------------------------------------------------
All required data are fetching from CSV file such as GroupName, GroupDescription, PermissionLevelName, PermissionLevelDescription, PermissionLevelList and Users.
-----------------------------------------------------------------------------------------------------------------------------------------------------------------
We can use this script in On-Premises(Offline) and Office365(Online).
---------------------------------------------------------------------
When start to run the script it will ask On-Premises (or) Office365 after choose the environment.
-------------------------------------------------------------------------------------------------
If it is On-Premises then it will ask Site URL and CSV file name finally Hit Enter then progress message will display there.
----------------------------------------------------------------------------------------------------------------------------
If it is Office365 then it will ask UserName, Password, Site URL and CSV file name finally Hit Enter then progress message will display there.
----------------------------------------------------------------------------------------------------------------------------------------------

#>


######################### Add SharePoint PowerShell Snapin ###############################################
 
 if ( (Get-PSSnapin -Name Microsoft.SharePoint.PowerShell -ErrorAction SilentlyContinue) -eq $null )
 {
 
 Add-PSSnapin Microsoft.SharePoint.Powershell
 
 }


 ########################### End of Add SharePoint PowerShell Snapin ##################################

  ######################## Set Execution Path ################################################
 
 $scriptBase = split-path $SCRIPT:MyInvocation.MyCommand.Path -parent
 
 Set-Location $scriptBase
 
 ################################# End of Set Execution Path #################################


############################ Functions Starts Here #########################################

function PermissionLevelCreation([string]$PermissionLevelName, [string]$PermissionLevelDescription, [string]$PermissionLevelList)
{
 try
  {
    $web = $Context.Web  
    $Context.Load($web)  
    $permissionlevel = $PermissionLevelList;
    #"ManageLists, CancelCheckOut, AddListItems, EditListItems, DeleteListItems, ViewListItems, ApproveItems, OpenItems, ViewVersions, DeleteVersions, CreateAlerts, ViewFormPages, ManagePermissions, BrowseDirectories, ViewPages, EnumeratePermissions, BrowseUserInfo, UseRemoteAPIs, Open"
    $RoleDefinitionCol = $web.RoleDefinitions
    $Context.Load($RoleDefinitionCol)
    $Context.ExecuteQuery() 
   
    $permExists = $false
    $spRoleDef = New-Object Microsoft.SharePoint.Client.RoleDefinitionCreationInformation
    $spBasePerm = New-Object Microsoft.SharePoint.Client.BasePermissions
    $permissions = $permissionlevel.split(",");

    foreach($perm in $permissions)
    {
    $spBasePerm.Set($perm)
    }  
    try
    {

    #Create Permission Levels for group

    $spRoleDef.Name = $PermissionLevelName
    $spRoleDef.Description = $PermissionLevelDescription
    $spRoleDef.BasePermissions = $spBasePerm   
    $roleDefinition = $web.RoleDefinitions.Add($spRoleDef)
    $Context.ExecuteQuery()
    Write-Host $PermissionLevelName "Permission Levels created successfully!!!"  
    }
    catch
    {
    Write-Host "Permission Level Name is already created so try it in different Permission Level Name" -ForegroundColor Red
    }
   }
   catch
   {
  
   }
}


function CreateGrpNPermissionLevel([string]$GroupName, [string]$GroupDescription, [string]$PermissionLevelName)
 
 {
 try
 {  
    try
    {
    #Retrieve Groups

    $Groups = $Context.Web.SiteGroups
    $Context.Load($Groups)
    $Context.ExecuteQuery() 

    #Create Group

    $NewGroup = New-Object Microsoft.SharePoint.Client.GroupCreationInformation
    $NewGroup.Title = $GroupName
    $NewGroup.Description = $GroupDescription
    $custGroup = $Context.Web.SiteGroups.Add($NewGroup)
    $Context.Load($custGroup)
    $Context.ExecuteQuery()
    Write-Host $GroupName "Group created successfully!!!"
    }
    catch
    {
    Write-Host $GroupName "Group Name is already created so try it in different Group Name" -ForegroundColor Red

     }

    try
    {

     #Retrieve Permission Level by Name
   
     $grpPermissionLevel = $Context.Web.RoleDefinitions.GetByName($PermissionLevelName)   

     #Bind Permission Level to Group

      $currentGroupName = $Context.Web.SiteGroups.GetByName($GroupName)
      $RoleDefBind = New-Object Microsoft.SharePoint.Client.RoleDefinitionBindingCollection($Context)
      $RoleDefBind.Add($grpPermissionLevel)
      $Assignments = $Context.Web.RoleAssignments
      $RoleAssignOneNote = $Assignments.Add($currentGroupName,$RoleDefBind)
      $Context.Load($currentGroupName)
      $Context.ExecuteQuery()
      Write-Host $PermissionLevelName "Group permission level activated successfully!!!"
    
    }
    catch
    {
    Write-Host $PermissionLevelName "Group Permission Level is already active only" -ForegroundColor Red
    }
 }
 catch
 {
 
 }
 }

 function addUsernGrp([string]$GroupName, [string]$Users)
 {
 try
 {
    $spoGName=$GroupName
    $currentGroup = $Web.SiteGroups.GetByName($spoGName)

    $userToAdd=$Users

    $userList = $userToAdd.split(",");
    foreach($NUsers in $userList)
    {
    #$spGrpUsers.Set($NUsers)
    $Member = $Context.Web.EnsureUser($NUsers)
    $Context.Load($Member)

    # Add Member (can be user or Security Group)
    $addMember=$currentGroup.Users.AddUser($Member)
    $Context.Load($addMember)
    $Context.ExecuteQuery()
    }

   
    Write-Host "Users Added Successfully to" $GroupName "!!!"
 }
 catch
 {

 }
 }


########################### Functions Ends Here ###########################################

 #Add references to SharePoint client assemblies and authenticate to Office 365 site - required for CSOM
Add-Type -Path "C:\Program Files\Common Files\Microsoft Shared\Web Server Extensions\15\ISAPI\Microsoft.SharePoint.Client.dll"
Add-Type -Path "C:\Program Files\Common Files\Microsoft Shared\Web Server Extensions\15\ISAPI\Microsoft.SharePoint.Client.Runtime.dll"
Add-Type -Path "c:\Program Files\Common Files\microsoft shared\Web Server Extensions\15\ISAPI\Microsoft.SharePoint.Client.Taxonomy.dll"

 $question = Read-Host "Are you proceed with On-Premises or Office365? If On-Premises Type ON Else Type OFF for Office365"


 If (($question -eq "ON") -or ($question -eq "on") -or ($question -eq "On") -or ($question -eq "oN"))
{
$SiteURL = Read-Host -Prompt "Please enter the Site URL"
$CSVFileName=Read-Host -Prompt "Please enter Your CSV file Name"


$Context = New-Object Microsoft.SharePoint.Client.ClientContext($SiteURL)


if (!$Context.ServerObjectIsNull.Value)
{
    Write-Host "Connected to SharePoint On-Premises site: '$SiteURL'" -ForegroundColor Green
   
    $web = $Context.Web  
    $Context.Load($web)  
    $Context.ExecuteQuery()
 
}

}


Elseif (($question -eq "OFF") -or ($question -eq "off") -or ($question -eq "Off") -or ($question -eq "oFF"))
{

$User = Read-Host -Prompt "Please enter your Login Name"
$Password = Read-Host -Prompt "Please enter your password" -AsSecureString
$Creds = New-Object Microsoft.SharePoint.Client.SharePointOnlineCredentials($User,$Password)
$SiteURL = Read-Host -Prompt "Please enter the Site URL"
$CSVFileName=Read-Host -Prompt "Please enter Your CSV file Name"


#Bind to site collection
$Context = New-Object Microsoft.SharePoint.Client.ClientContext($SiteURL)
$Creds = New-Object Microsoft.SharePoint.Client.SharePointOnlineCredentials($User,$Password)
$Context.Credentials = $Creds

if (!$Context.ServerObjectIsNull.Value)
{
    Write-Host "Connected to SharePoint Office365 site: '$SiteURL'" -ForegroundColor Green

     
    $web = $Context.Web  
    $Context.Load($web)  
    $Context.ExecuteQuery()
    
 }


}


Else
{
    Write-Host -BackgroundColor White -ForegroundColor Red "INVALID ENTRY! Please try again."
    Break
    #Exit
}


 #################Creating Group##########################################################

 
$permissionLevelsCSV = $scriptBase + "\" + $CSVFileName
 
 import-csv $permissionLevelsCSV |select -first 1 | where {
 
 PermissionLevelCreation $_.PermissionLevelName $_.PermissionLevelDescription $_.PermissionLevelList
 
 }


$GrpCreationPermissionLvlBindingtoGrpCSV = $scriptBase + "\" + $CSVFileName
 
 import-csv $GrpCreationPermissionLvlBindingtoGrpCSV | where {

 
    CreateGrpNPermissionLevel $_.GroupName $_.GroupDescription $_.PermissionLevelName
 

 }


 $AddUserstoGrpCSV = $scriptBase + "\" + $CSVFileName
 
 import-csv $AddUserstoGrpCSV | where {

 
    addUsernGrp $_.GroupName $_.Users
 

 }


Sample CSV file:


To enable SideLoading feature in Non - Developer Site for App Deployment

Add-PSSnapin Microsoft.SharePoint.PowerShell

$programFiles = [environment]::getfolderpath("programfiles")

add-type -Path $programFiles'\SharePoint Online Management Shell\' + `
  'Microsoft.Online.SharePoint.PowerShell\Microsoft.SharePoint.Client.dll'

Write-Host `
  'To enable SharePoint app sideLoading, ' + `
  'enter Site Url, username and password'

$siteurl = Read-Host 'Site Url'
$username = Read-Host "User Name"
$password = Read-Host -AsSecureString 'Password'

if ($siteurl -eq '') {
    $siteurl = 'https://vigtech.sharepoint.com/sites/MyTeamSite'
    $username = 'sivavicky@vigtech.onmicrosoft.com'
    $password = ConvertTo-SecureString -String 'mypassword!'`
                -AsPlainText -Force
}
$outfilepath = $siteurl -replace ':', '_' -replace '/', '_'

try
{
    [Microsoft.SharePoint.Client.ClientContext]$cc = `
      New-Object Microsoft.SharePoint.Client.ClientContext($siteurl)

    [Microsoft.SharePoint.Client.SharePointOnlineCredentials]$spocreds = `
      New-Object `
      Microsoft.SharePoint.Client.SharePointOnlineCredentials($username, $password)

    $cc.Credentials = $spocreds
    $sideLoadingEnabled = `
    [Microsoft.SharePoint.Client.appcatalog]::IsAppSideloadingEnabled($cc);
   
    $cc.ExecuteQuery()
   
    if($sideLoadingEnabled.value -eq $false) {
        Write-Host -ForegroundColor Yellow `
          'SideLoading feature is not enabled on the site:' $siteurl
        $site = $cc.Site;
            $sideLoadingGuid = `
           new-object System.Guid "AE3A1339-61F5-4f8f-81A7-ABD2DA956A7D"
            $site.Features.Add($sideLoadingGuid, $false, `
            [Microsoft.SharePoint.Client.FeatureDefinitionScope]::None);
            $cc.ExecuteQuery();
           Write-Host -ForegroundColor Green `
          'SideLoading feature enabled on site' $siteurl
    }
   
    Else {
        Write-Host -ForegroundColor Green `
          'SideLoading feature is already enabled on site' $siteurl
    }
}

Catch {
    Write-Host -ForegroundColor Red `
      'Error encountered when trying to enable SideLoading feature' `
      $siteurl, ':' $Error[0].ToString();
}

Site Collection Backup and Restore

Backup Site Collection 


######################### Add SharePoint PowerShell Snapin ###############################################
 
 if ( (Get-PSSnapin -Name Microsoft.SharePoint.PowerShell -ErrorAction SilentlyContinue) -eq $null )
 {
 
 Add-PSSnapin Microsoft.SharePoint.Powershell
 
 }


 ########################### End of Add SharePoint PowerShell Snapin ##################################

  ######################## Set Execution Path ################################################
 
 $scriptBase = split-path $SCRIPT:MyInvocation.MyCommand.Path -parent
 
 Set-Location $scriptBase
 
 ################################# End of Set Execution Path #################################


############################ Functions Starts Here #########################################

function SiteBackUp([string]$SiteURL, [string]$DestinationPath)
{
 try
  {

    Backup-SPSite -identity $SiteURL -path $DestinationPath -nositelock -Force

    Write-Host $SiteURL "Backup Successfully Completed and Placed in the" $DestinationPath

  }
  catch
  {
  }
}

######################### Function Ends Here ################################################


Write-Host "Site BackUp Process Started!!!"

$CSVFileName=Read-Host -Prompt "Please enter Your CSV file Name"


######################## Data fetching from CSV #############################################

 $SiteBackupCSV = $scriptBase + "\" + $CSVFileName
 
 import-csv $SiteBackupCSV | where {

 
    SiteBackUp $_.SiteURL $_.DestinationPath
 

 }


Sample CSV file:


SiteURL DestinationPath
http://sp2013devvm/sites/Pub2016  D:\Backupfolder\first.bak

Restore Site Collection


######################### Add SharePoint PowerShell Snapin ###############################################
 
 if ( (Get-PSSnapin -Name Microsoft.SharePoint.PowerShell -ErrorAction SilentlyContinue) -eq $null )
 {
 
 Add-PSSnapin Microsoft.SharePoint.Powershell
 
 }


 ########################### End of Add SharePoint PowerShell Snapin ##################################

  ######################## Set Execution Path ################################################
 
 $scriptBase = split-path $SCRIPT:MyInvocation.MyCommand.Path -parent
 
 Set-Location $scriptBase
 
 ################################# End of Set Execution Path #################################


############################ Functions Starts Here #########################################

function SiteRestore([string]$SiteURL, [string]$SourcePath, [string]$DatabaseName)
{
 try
  {

    Restore-SPSite -identity $SiteURL -path $SourcePath -databasename $DatabaseName -force

    Write-Host $SiteURL "Restore Successfully"

  }
  catch
  {
  }
}

######################### Function Ends Here ################################################


Write-Host "Site Restore Process Started!!!"

$CSVFileName=Read-Host -Prompt "Please enter Your CSV file Name"


######################## Data fetching from CSV #############################################

 $SiteBackupCSV = $scriptBase + "\" + $CSVFileName
 
 import-csv $SiteBackupCSV | where {

 
    SiteRestore $_.SiteURL $_.SourcePath $_.DatabaseName
 

 }


Sample CSV file:


SiteURL SourcePath DatabaseName
http://sp2013devvm/sites/Pub2016  D:\Backupfolder\first.bak Wss_content


Insert item to the List from CSV file

<#

Purpose of this script:
-----------------------
To insert as an item to the List from CSV file . Insert process done for both On-Premises and also for Office365 environment.

Run Process
-----------
Open this InsertMasterData_List.ps1 file --> Hit f5 button --> Ask On-Premises (or) Office365 --> Answer the following questions

--> AtLast it shows "Data Added Successfully" else if no data in CSV file it shows "No Data Found" in the output screen.

Important Notes
---------------
Sharepoint List Column names and CSV file Header names should be same.


#>


######################### Add SharePoint PowerShell Snapin ###############################################
 
 if ( (Get-PSSnapin -Name Microsoft.SharePoint.PowerShell -ErrorAction SilentlyContinue) -eq $null )
 {
 
 Add-PSSnapin Microsoft.SharePoint.Powershell
 
 }
 
########################### End of Add SharePoint PowerShell Snapin ##################################

$question = Read-Host "Are you proceed with On-Premises or Office365? If On-Premises Type ON Else Type OFF for Office365"


 If (($question -eq "ON") -or ($question -eq "on") -or ($question -eq "On") -or ($question -eq "oN"))
{


$SiteURL=Read-Host -Prompt "Please enter the Site URL"

$ListNM=Read-Host -Prompt "Please enter the List Name"

$CSVFileName=Read-Host -Prompt "Please enter Your CSV file Path (forEx:  C:\Users\spadmin\Desktop\CreateItemsToList\MaterData.csv)"

Write-Host "Connected to SharePoint On-Premises site: '$SiteUrl'" -ForegroundColor Green

try
{

$web = Get-SPWeb $SiteURL

 $Lists = $web.Lists[$ListNM]


#Get the CSV file and connect to the SharePoint list

$csvData = import-csv $CSVFileName 


foreach($items in $csvData)
{
$properties = $items | Get-Member -MemberType Properties

     $listContext = $Lists.AddItem()

    for($i=0; $i -lt $properties.Count;$i++)
    {
        $column = $properties[$i]
       
        $colName=$column.Name
              
        #Write-Host $colName
     
        $listContext[$colName] = $items.$colName
    }
     $listContext.Update()
   } 


if($csvData -ne $null)
{
Write-Host "Data Added Successfully !!!"
}
else
{
Write-Host "No Data Found in CSV !!!" -BackgroundColor White -ForegroundColor Red
}
}
catch
{}

}
Elseif (($question -eq "OFF") -or ($question -eq "off") -or ($question -eq "Off") -or ($question -eq "oFF"))
{


Add-Type -Path "C:\Program Files\Common Files\Microsoft Shared\Web Server Extensions\15\ISAPI\Microsoft.SharePoint.Client.dll"
Add-Type -Path "C:\Program Files\Common Files\Microsoft Shared\Web Server Extensions\15\ISAPI\Microsoft.SharePoint.Client.Runtime.dll"

$SiteURL=Read-Host -Prompt "Please enter the Site URL"

$User = Read-Host -Prompt "Please enter your Login Name"

$Password = Read-Host -Prompt "Please enter your password" -AsSecureString

$ListName=Read-Host -Prompt "Please enter the List Name"

$CSVFileName=Read-Host -Prompt "Please enter Your CSV file Path (forEx:  C:\Users\spadmin\Desktop\CreateItemsToList\MaterData.csv)"

try
{

$Creds = New-Object Microsoft.SharePoint.Client.SharePointOnlineCredentials($User,$Password)


$Context = New-Object Microsoft.SharePoint.Client.ClientContext($SiteURL)
$Creds = New-Object Microsoft.SharePoint.Client.SharePointOnlineCredentials($User,$Password)
$Context.Credentials = $Creds

if (!$Context.ServerObjectIsNull.Value)
{
    Write-Host "Connected to SharePoint Online site: '$SiteUrl'" -ForegroundColor Green
   
    $web = $Context.Web  
    $Context.Load($web)
    $Context.ExecuteQuery()  
    $Lists = $Context.Web.Lists.GetByTitle($ListName)
    $Context.Load($Lists)

    $Context.ExecuteQuery()
 
}

#Get the CSV file and connect to the SharePoint list

$csvData = import-csv $CSVFileName


foreach($items in $csvData)
{
$properties = $items | Get-Member -MemberType Properties

    $ListItemInfo = New-Object Microsoft.SharePoint.Client.ListItemCreationInformation
   
    $listContext = $Lists.AddItem($ListItemInfo)


    # $ni = $Lists.AddItem()

    for($i=0; $i -lt $properties.Count;$i++)
    {
        $column = $properties[$i]
       
        $colName=$column.Name
              
        #Write-Host $colName
     
        $listContext[$colName] = $items.$colName
    }
     $listContext.Update()
     $Context.ExecuteQuery()

}
if($csvData -ne $null)
{
Write-Host "Data Added Successfully !!!"
}
else
{
Write-Host "No Data Found in CSV !!!" -BackgroundColor White -ForegroundColor Red
}
}
catch
{}

}
Else
{
    Write-Host -BackgroundColor White -ForegroundColor Red "INVALID ENTRY! Please try again."
    Break
    #Exit
}

Sample CSV file: